How to Make an Image Transparent Background for Free

Creating a Transparent Background became important for me when I started designing social media posts and simple website graphics. I used to struggle with images that had white or messy backgrounds, which made my designs look unprofessional. I thought removing backgrounds would be complicated, but once I tried a few free online tools, I realized it was actually quick and easy.
Now, whenever I need a clean logo, product image, or thumbnail, I simply remove the background in a few clicks and download it as a PNG file. It saves me time, improves the overall look of my content, and helps me create more polished designs without needing expensive software or advanced editing skills.
Quick Overview
- Transparent backgrounds remove the image’s background, leaving only the subject.
- Free tools like FreePixel Background Remover make it easy to do this quickly.
- Save images as PNG or WebP to preserve transparency; JPG won’t work.
- Use high-res images with clear contrast for cleaner results and refine edges if needed.
- Beginners can use FreePixel, intermediates Canva, and advanced users GIMP for more control.
What Does Transparent Background Mean?
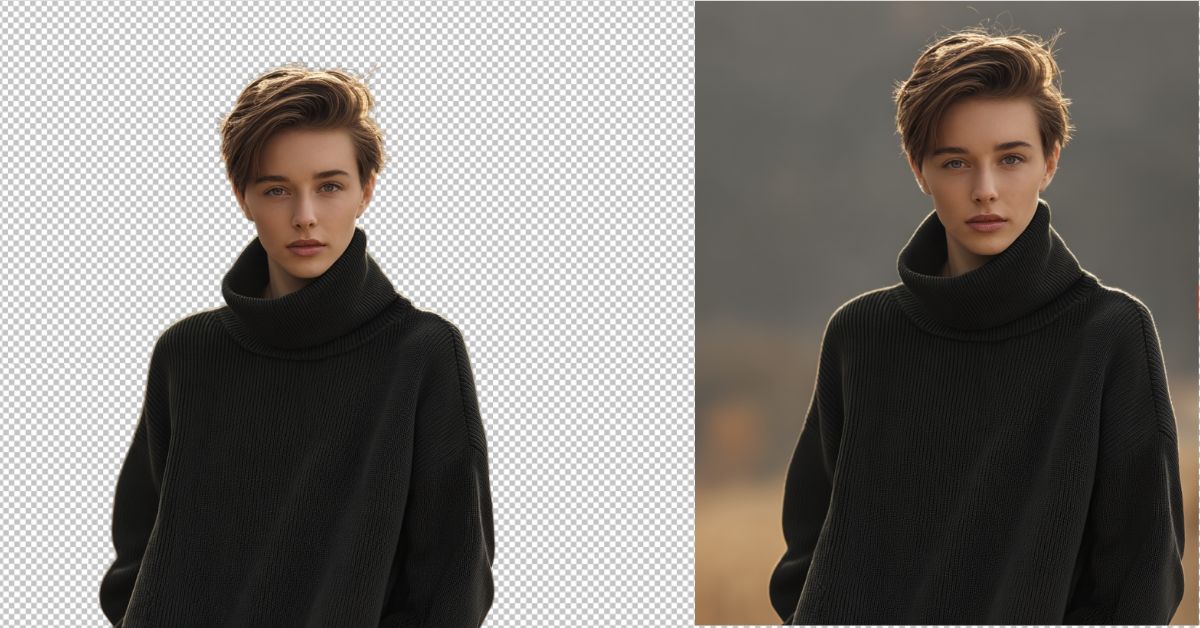
A transparent background means the background of an image is removed completely, leaving only the main subject (such as a person, object, or logo).
Instead of showing a white or coloured background, the empty space becomes invisible. This allows you to:
- You can put the image on any background colour.
- Stick it on posters or banners
- Put it on top of videos.
- Use it when designing websites.
When you open a transparent image in editing software, you'll usually see a grey and white checkerboard pattern. This pattern shows that something is transparent.
Important: Please always save transparent images in PNG or WebP format. JPG files do not support transparent backgrounds.
Method 1: Use FreePixel Background Remover (Fastest Method)
If you want the easiest and quickest way, FreePixel Background Remover is a great option.
It uses AI technology to automatically detect the subject and remove the background in seconds.
Step-by-Step Guide
- Open the FreePixel Background Remover tool.
- Then upload your image.
- Wait a few seconds while the AI removes the background automatically.
- Look at what will happen.
- Download the image as a PNG file.
Why choose FreePixel Background Remover?
- You don't need to be an editor.
- The camera will detect the subject automatically.
- Quick to process
- Results that look clean and professional
- Great for product images, portraits and logos
This method is perfect for beginners and small business owners.
Method 2: Use Free Online Background Removal Tools
There are several free online tools that can remove backgrounds.
How It Works
- Upload your image.
- The AI finds the main subject.
- The background is removed by itself.
- First, download the PNG file.
Some tools also let you make manual adjustments to refine edges or restore small details.
This option works well if:
- You need to make quick changes.
- You don't want to install any software.
- You are using a laptop or mobile device.
Method 3: Use Canva for Background Removal
Canva has a simple background remover feature (sometimes you need Pro access).
Here are the steps for using Canva:
- Then, upload your image to Canva.
- Click on the picture and select "Edit Image."
- Choose "Background Remover."
- If necessary, adjust the edges.
- Download the file as a PNG file, with transparency enabled.
Canva is especially helpful if you are already designing:
- Instagram posts
- Ads on Facebook
- Presentations
- Flyers
- Business cards
Method 4: Use GIMP (Free Advanced Editing Tool)
If you want more control, GIMP is a powerful free editing software.
Steps in GIMP
- Open your image in GIMP.
- Right-click the layer and select "Add Alpha Channel."
- Use the 'Fuzzy Select Tool' or 'Foreground Select Tool'.
- Remove the background area that you have selected.
- Save the file as a PNG.
This method is perfect for complicated backgrounds or detailed editing jobs.
When Should You Use Transparent Background?
A Transparent Background is useful in many situations.
For E-commerce
- Clean product listings
- White or colored custom backgrounds
- Professional store appearance
For Social Media
- Custom graphics
- Profile pictures
- Creative posts
For Logos
- Brand logos without white boxes
- Flexible placement on any background
For Marketing
- Ads
- Brochures
- Website banners
Transparent images look more modern and flexible.
Common Mistakes to Avoid
Here are some common mistakes people make:
- Saving the file as JPG
- Using low-quality images
- Not cleaning rough edges
- Removing important parts of the subject
- Forgetting to zoom in for detailed editing
Always double-check your edges before downloading.
Pro Tips for Cleaner Results
To get the best transparent background result:
- Use images that have a high resolution.
- Choose photos where the subject and background stand out from each other.
- Avoid backgrounds that are too busy.
- Make the edges around the hair and small details neater.
- Look at the file before you download it.
If your first result is not perfect, try re-uploading or manually refining the edges.
Final Thoughts
It's easy to create a transparent background. You don't need expensive tools or to have professional design experience.
If you want quick and automatic results, FreePixel Background Remover is a simple and efficient solution. If you want more control, try using software like Canva and GIMP, which provide extra editing options.
With just a few clicks, you can remove backgrounds and create clean, professional images — completely free.
Now you're ready to upgrade your designs with transparent images that look modern and polished.
(Source: Wikipedia)
FAQs
1. What is a transparent background?
It removes the image background, leaving only the subject, so it works on any design or platform.
2. Can I remove backgrounds for free?
Yes! Tools like FreePixel Background Remover or free online editors let you do this quickly.
3. Which format supports transparency?
Use PNG or WebP. JPG does not support transparency.
4. How do I get clean results?
Use high-res images, clear contrast, simple backgrounds, and refine edges if needed.
5. Best tools for beginners vs advanced users?
- Beginners: FreePixel Background Remover
- Intermediate: Canva
- Advanced: GIMP
Read Also


Jun 13, 2022
4 Best Membership WordPress Plugins
Having a membership website will increase your reputation and strengthen your engagement w
Comments (0)